Dwolla is a new payment processing system that we’ve started using to replace both PayPal, which is expensive (2.9% is their exorbitant fee) and also to replace the old, tired send checks in the mail method. Snail mail is cheap but the postal system here in the US is about as reliable as a Pontiac.
Here’s a step-by-step guide to setting up Dwolla
1. Check Your Email Inbox
The process starts when a merchant (Complete Web Resources, etc) sends a request, you’ll see it in your inbox titled something like “Rapid Queue Requested money from you with Dwolla!” Great, open the email and let’s get started.

Then click the link from within the mail and follow it over to the Dwolla site. As shown bellow.

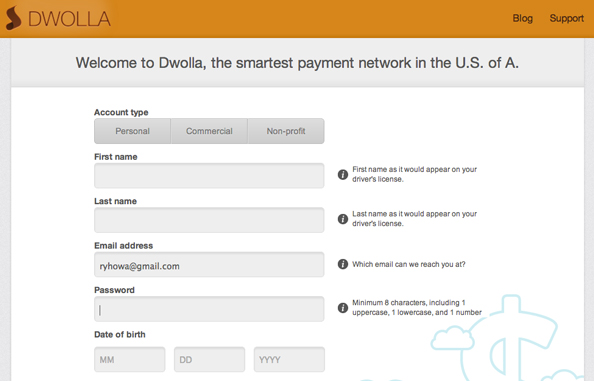
2. Sign Up Page – Fill Out Your Information
You’ll want to select a personal account for now. If you fall in love with Dwolla and want to do more with it at some point, by all means upgrade to another account type then. Here’s a snapshot of the Account Setup Page. You’ll fill out your First and Last Name, Email Address, Password, DOB, Gender and check the box to agree to the terms of service.
3. Email Verification
Then you will be sent to an email verification page. Head back to your email browser and click the link they give you.


4. Enter Your Password and Continue Your Account Setup
The first screen you come to is just for entering your password.

Then you come to a screen that really wants you to test out sending Dwolla’s money. It’s an example drill to get you used to their interface. Simply click, NO THANKS.

5. Enter and Verify Your Phone Number
This is part of their security process and is the same as PayPal and others. Simply enter your phone number and then verify via SMS (text message) or by receiving a voice call from a robot that reads you a code. Enter the code and continue.

6. Enter Your Address
Just continuing on the process here. Enter your adress details in the form provided.

7. Create and Enter Your 4-digit Pin Number

8. Set Up Your Bank Information
Next you’ll need to connect your bank with the Dwolla system. We;re almost finished here. Just a few more steps to go.

After clicking “SYNC WITH BANK” fill out the required fields. For the account name, you may just want to use the name of your bank.

9. Accept Dwolla’s Terms of Service

10. Pay Your Bill
Click the Payment Activity tab on the left sidebar and select the Requests tab where a numerical one should show.

Click on the “Details” link and then click “Pay This Request”

11. Finish Account Set Up
For this last step, unfortunately Dwolla sometimes wants a photo ID on file. I spoke with Ian Zimmerman at Dwolla about this issue and he explained that only sometimes is a photo required. Good to hear. His note is included here for clarification.
“When a customer signs up for an account and they link their bank account, we ask for an SSN to verify their information. We use a service that compares this SSN against the information that was provided upon registration If these two don’t match up, then we ask for a photo ID. Not every user has to provide photo ID. It’s important to point out that customers should make sure they enter the correct information upon registration. If you would like to take a look at Dwolla’s Privacy Policy to ensure your information is secure, please do so here.”
Fortunately, if you are required to add a photo and have a smart phone handy, this is really easy. Just snap a photo of your driver’s license and email it to yourself, and then upload it to the site. You can of course do the same thing with a digital camera if you have one handy, or a scanner will work as well. You could even use the camera on your iPad or Laptop to snap a quick photo.
It takes Dwolla a day or two to verify your photo ID, but after that, you’re good to go.
A NOTE from the Author: This is a bit of extra work, I know, but it’s nothing that most modern humans hanen’t done before, or do on a regular basis. The reason we like Dwolla is that it saves money. At only 25 cents per transaction, we’re saving a ton of money over PayPal.
A quick look at the math: SEO client at a budget of say $2000 a month at PayPal’s 2.9% fee is a cost of $58. You can buy a nice pair of shoes for $58. Span that out over a year, and the savings is a whopping $696.
Hopefully this system catches on, and we can get everyone automated over the next few months. It’s one of the last few items left in making Rapid Queue a virtually paper-free office.